
Thursday, May 29, 2008
Mapwing
This is Mapwing. A programme that enables you to create a virtual tour from photos and images. Create a map background, then add pins to pinpoint areas you would like people to look at. Add photos and text (descriptions, information etc) to those areas. Embed into a wiki, or a website.
Saturday, May 24, 2008
Del.icio.us How to
Del.icio.us is one of those free sites you must have. Too many times you will have found yourself in this situation, you have bookmarked favourite websites on your computer at home and different ones on your computer at work! You sit down at the computer at work and want the bookmarked sites that are on your home computer. Del.icio.us is the website that will store all of your bookmarks in one central place so that you can access them on any computer with internet access. To set up your Del.icio.us account click on this link Del.icio.us
Click on register
type in user name. I usually suggest at this point that you might like to have 2 Delicious accounts, one for personal and one for education use. Use your own name (first and last name) as a user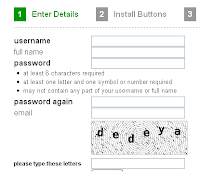 name. Type your full name, type your password twice (it must have at least one number in it). Type in your email, don't use your class one, use your private one as you will want to take this list with you when you go. Type the letters you see in the gray box, click Register.
The next win dow will install your Delicious buttons onto your browser toolbar. Safari will instruct you to click and drag the buttons up and drop onto your toolbar. The Firefox and Explorer browser will ask you to click and install extensions.
 This one asks you to 'Install the Extension Now!
This message may appear saying that 'Firefox prevented this site...
Just click the Options button and click Allow and then Close
In the next dialogue box click on the item you want to install, then click Install.
Once you have installed your buttons, it is best to close your browser and reopen it.
Your 2 new buttons will appear on your toolbar. This button will take you to your Delicious page and this button
 is your Tag button. When you find a website you want to book mark, click on the Tag button. A new window will open with the name of the website, the address, a place for you to add notes and tags. Add a note that explains what the website does.
  Tags are very important, tags will appear at the right hand side of your Delicious page and are an important navigational tool for you and for others who might look at your site. If it is a maths site you might consider adding specific tags such as geometry or statistics. Click Save.
These tags will need to get sorted into Bundles when you return to your Delicious page. Click on the Delicious button on your toolbar to return to your Delicious page.
If you do not bundle your tags they will end up as a long list down the side of your page. Click on the blue bundle tags link. Type in a bundle name in the new bundle box
 click Create. Type in some tags that will be added to that bundle, when you have enough tags click Save Changes
  Go back to your Delicious page and you will see your bundles and tags, (you will only see tags of the Websites you have added so far.)

type in user name. I usually suggest at this point that you might like to have 2 Delicious accounts, one for personal and one for education use. Use your own name (first and last name) as a user
 name. Type your full name, type your password twice (it must have at least one number in it). Type in your email, don't use your class one, use your private one as you will want to take this list with you when you go. Type the letters you see in the gray box, click Register.
The next win
 dow will install your Delicious buttons onto your browser toolbar. Safari will instruct you to click and drag the buttons up and drop onto your toolbar. The Firefox and Explorer browser will ask you to click and install extensions.
 This one asks you to 'Install the Extension Now!
This message may appear saying that 'Firefox prevented this site...
Just click the Options button and click Allow
 and then Close
In the next dialogue box click
 on the item you want to install, then click Install.
Once you have installed your buttons, it is best to close your browser and reopen it.
Your 2 new buttons will appear on your toolbar. This button
 will take you to your Delicious page and this button
 is your Tag button. When you find a website you want to book mark, click on the Tag button. A new window will open with the name of the website, the address, a place for you to add notes and tags. Add a note that explains what the website does.
  Tags are very important, tags will appear at the right hand side of your Delicious page and are an important navigational tool for you and for others who might look at your site. If it is a maths site you might consider adding specific tags such as geometry or statistics. Click Save.
These tags will need to get sorted into Bundles when you return to your Delicious page. Click on the Delicious button
 on your toolbar to return to your Delicious page.
If you do not bundle your tags they will end up as a long list down the side of your page. Click on the blue
 bundle tags link. Type in a bundle name in the new bundle box
 click Create. Type in some tags that will be added to that bundle, when you have enough tags click Save Changes
  Go back to your Delicious page and you will see your bundles and tags, (you will only see tags of the Websites you have added so far.)
Wednesday, May 14, 2008
Fotoflexer

Fotoflexer is a photo editing programme with a lot of features. You can upload a photo from your computer (resizeit so it is less then 500kb) to the website, autofix the photo or make the adjustments yourself using the Red eye, crop, adust, flip or rotate. Then comes the fun part, click on the other tabs to make changes to your photo

 This is the Effects toolbar, click on an effect and it will add the change to your photo, click Apply, click Save. It will save to Fotoflexer but will also offer other places to save such as to a Blog, Picasa, Flickr or to your hardrive. You can also email the photo, or retrieve the code so that you can embed it into a website. To save you do need to be a registered
  user. In the 'Decorate' options you can add stickers, borders, draw on it and erase parts of the photo.
Other options are adding Animations, fixing blemishes using the Beautify option, bulge, pinch, stretch and squish using the Distort option or add images on the layer menu choice. There is also a Geek option for cutting out, morphing etc.
Classroom Application:
Children can alter the images in so many ways to be used in whatever application offline or online. Some of the effects are usually only av
 ailable in expensive software.

Monday, May 12, 2008
Kerpoof - Motivate children's writing
 Kerpoof is a great piece of software that you can use to motivate
children's writing. It is free, colourful and interactive.
Make a Picture - choose a background and make a picture using the graphics provided, use the text button to add text to the page. Print the page out as full A4 or as a card. You can also choose to print it out in full colour or as a colouring book page
 .
. Make a Movie option allows you to create a movie with moving objects.  There are 7 different story lines to pick from, several scene pages and a limited amount of graphics for each page. Choose from the animation list to animate the objects. Text can be added to the scene as well. It can be saved to an account at Kerpoof or printed.
 There are 7 different story lines to pick from, several scene pages and a limited amount of graphics for each page. Choose from the animation list to animate the objects. Text can be added to the scene as well. It can be saved to an account at Kerpoof or printed.
Make a drawing has drawing tools where you can create a picture and print it out.

Make a card has 8 preset cards including Birthday, Thank you etc. with a limited set of graphics to add.
The Make a Story is my favourite option with 19 different scenes,  some graphics, text boxes and text speech bubbles. You can also add more scenes to the story.
 some graphics, text boxes and text speech bubbles. You can also add more scenes to the story.
 This would be a great site for those children who don't have anything to write about as it provides the scenes and graphics, but they get to add the words. They can manipulate the graphics and can add their own drawings to it by using the pen tool. It prints out beautifully as well.
VoiceThread
Voicethread is a collaborative space of group conversations.
The example below is created by a student called Zoe in America, she designed it around her interest in Global Warming.

A VoiceThread can be created using documents, videos and photos. Comments can be added by registered users by text or voice.
The example below is created by a student called Zoe in America, she designed it around her interest in Global Warming.

They can be exported to your computer as a widescreen movie and to wikis, blogs and webpages. You can use a variety of images: JPG, GIF, BMP, PNG; docs: PPT, PPS, PDF, DOC, XLS; and videos. If you've got a Flickr account, you can import from those as well.
It has a 'doodle' feature which means you can draw over the images to make a point while you are recording your voice.
Classroom Application:
a way for children within the class to collaboratively present
It has a 'doodle' feature which means you can draw over the images to make a point while you are recording your voice.
Classroom Application:
a way for children within the class to collaboratively present
- an investigation
- book report
- any writing genre (recounts, reports, explanations, descriptions, procedural etc)
- technology challenge
Sketchcast
Sketchcast is an online drawing and writing programme. This is a great way to record your voice, draw pictures and type text realtime and then play it back as a movie. You can stop and start the recording at anytime, it can be embedded in a blog or a wiki, or can be viewed through your account. What are the applications for the classroom?
- retelling a story
- showing the workings of a math problem
- Tic Tac Toe
- teaching a new concept
- publishing a story
Toondoo and Creating Comics

Since posting on this blog about Kerpoof, I have been directed to another comic making interactive online site. This one is called ToonDoo. You can make 1-3 page comics using numerous backgrounds and graphics. You can change the body position of the figures and facial expressions. There are lots of props and drawing tools to create your own backgrounds. You can save the comics and publish for everyone to see or you can publish privately. If you publish for anybody to see then anybody can comment. That was the only problem with this programme were the comments as they could be inappropriate for children. Some of the cartoons made by other people were a little dodgy as well.
The actual editing page is fine but the main home page changes all the time so you are never sure what is going to pop up. But it is still a worthwhile site to use with careful monitoring. Particularly for younger children I would set up the editing page for them, then there is no need for them to see the home page.
There is no download feature which is a shame as it would be great to download the comic and print it whole screen. But there are always ways around this, you can print out the page when it is in View mode, cut out the comic and glue on to other paper. Or you can take a screen capture (Windows: press the Print Screen button on your keyboard, open Paint, Press Ctrl V and then use the square selector tool to crop the area you need. Copy paste that piece into the Wordprocessor of your choice) Mac Users press Shift, Ctrl, Option and 4, click and drag around the comic, paste into your wordprocessor page.
Again this is another great interactive writing motivating tool.
UDL Book Builder
 Discovered this website UDL Book Builder where you can create, read and share digital books. You do need to register to create books.
Click on Create and Edit books. There are plenty of guides to help you create books

You can add your own graphics and photos. If you are making a story using photos of your children, comicfy them by changing them in a photo editing programme like Photofiltre.
UDL has lots of helpful tips on the way, they 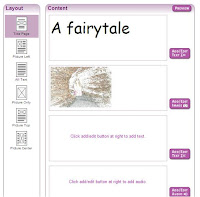 help you to write text, choose images, add audio clips and glossary terms, and there are prompts, hints, and models for your books. You can use your published books with students online, download them to your computer, copy them to a CD, or share them with others by clicking on "Share to Library."
 help you to write text, choose images, add audio clips and glossary terms, and there are prompts, hints, and models for your books. You can use your published books with students online, download them to your computer, copy them to a CD, or share them with others by clicking on "Share to Library."
 Here is an example of a book

Teachers can use this site to create their own books for children or students can publish their own work.
Saturday, May 10, 2008
Slide - Make slideshows of your photos


Found this site http://www.slide.com/ that make slideshows of your photos, great for showing off a series of photos in a blog. Click on Slideshows to make the slideshow, select the Browse button choose photos from your hardrive by holding down the Ctrl Key and click OK. Choose from the choices of how you want your slideshow to look. The slideshow above has been created in a Puzzle format and the one below is sliding. Other formats available are Collage, Melt, News etc.


Creating Avatars
I have had a teacher ask me if there is site where children can create their own avatars without having to register their names etc. Generally you do have to register but with some sites you can get away with doing a screen capture.
 .
.
 And then there is DoppelMe you can create your avatar and when you have finished you can right click, select Copy and paste into the programme of your choice.

First of all 'What is an avatar?'
An avatar is a computer user’s representation of himself or herself.
An avatar is a computer user’s representation of himself or herself.
If you have a yahoo account you can make avatars where you can copy and paste the code into your Blog site, here is mine!
 But this one is not really suitable for children, great for adults. Then I searched specifically for childr
 en and found this site Reasonably Clever Block Head Iconiser
But this one is not really suitable for children, great for adults. Then I searched specifically for childr en and found this site Reasonably Clever Block Head Iconiser
To use this picture you need to take a screen capture (Windows users, press Print Screen button on your keyboard, paste into Paint, click and drag around the part you want and copy/paste it into the programme you want to use) (Mac users press Shift, Control, Apple, 4, click and drag around the part you want and paste it into the programme you want to use).
Another programme called Build your Wildself has students creating themselves and then adding animal body parts to finish off as a Wild Self. Once students had created their “wild self”, click on Get a Wild desktop, right click it and select Save Image As
  and you will have a copy of the avatar.
 Build your Wildself has students creating themselves and then adding animal body parts to finish off as a Wild Self. Once students had created their “wild self”, click on Get a Wild desktop, right click it and select Save Image As
  and you will have a copy of the avatar.
Kerpoof a site I have reviewed previously in this blog allows you to make avatars but you need to be registered. Once you have registered, go to My Stuff and create your avatar
 .
.Again there is no download feature but you can do a screen capture before you click Save.


Finally Weemee. There are lots of choices to make changes to the avatar, you can screen capture it or register to get the code to insert into your blogs.
Teachers will need to try these out themselves to find out which is the best for their class situation.
Bubblr- Photo Slideshow with speech bubbles
Run your mouse without clicking over the slideshow to make it move.
Another way of publishing photos in a comic strip is using Bubblr. Search for photos in Flickr by typing in a search word or a user name.
 Drag the photos you want to use down into the panels, drag the speech bubbles up and type in words. click on After Current to add more photos, click Publish when you are finished. This comic strip will be saved and then you can make the choice of emailing, adding to a blog site or printing.
This could be a great way to motivate reluctant writers as they can search for photos that interest them or they could be photos on certain topics. Be aware though that it is possible to get questionable photos if you type inappropriate words.
Subscribe to:
Posts (Atom)