Download CleVR Stitcher to your computer. Upload several photos to Clever Stitch and the software will create a panorama mixture of your photos.
You can upload the finished photo to the Clever stitch site, and then copy the embed code to create an interactive Panorama on your wiki or blog.
This is a panorama I made with my photos from Mount Eden
Sunday, August 8, 2010
Thursday, May 20, 2010
Lino It
Lino It is a an online stickies wall. It is similar to Wallwisher where you can post stickers, add photos and movies. You can also upload links to documents. It is collaborative and can be embedded into blogs and wikis. This could be a great presenting tool for students.
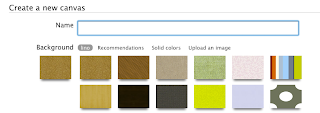
Once you have joined up click on Create a New Canvas
Choose a Background, Name your Canvas.

Choose who has access and the Details you want to show. Click on Create a Canvas
Add Stickies by dragging a sticky onto the canvas and typing into it.
Add a photo by clicking on the Photo icon, insert a photo from your computer, add text by clicking on the Frame option.
Add a movie by making a choice from Youtube, Ustream or Vimeo, paste in the URL of the video.
Attach files to the canvas by clicking on the Attachment button. Choose a file by browsing and an upload link to the file will appear.
Add a Transparent sticky by clicking on the Transparent button, type your text in.
Extra Features
Click on the Information button on the Palette to show the embed code.
Dates can be added to text stickies.
Pin a sticky to a canvas by moving the mouse over the top right hand of the sticky, a pin will appear, click on it to pin it. To unpin it, click on the pin again.
Move the stickies behind or in front by holding down the (Option Key-Mac) (Alt key-Win) and clicking.
Add tags to stickies which enables highlighting of all stickies with that tag.
There is a peel off option, click on the tick icon at the bottom of the right hand side of sticky. Once it has been peeled it is gone forever.
Sizes and colour of text can be changed when editing.
Stickies can be resized by clicking and dragging on the bottom right hand corner.
New stickies can be highlighted by clicking on 'Highlight New'.
How to use Lino It
In the example below I have used Lino It as a Presentation instructional tool.
Other ways of using it
Once you have joined up click on Create a New CanvasChoose a Background, Name your Canvas.

Choose who has access and the Details you want to show. Click on Create a Canvas
Add Stickies by dragging a sticky onto the canvas and typing into it.
Add a photo by clicking on the Photo icon, insert a photo from your computer, add text by clicking on the Frame option.
Add a movie by making a choice from Youtube, Ustream or Vimeo, paste in the URL of the video.
Attach files to the canvas by clicking on the Attachment button. Choose a file by browsing and an upload link to the file will appear.
Add a Transparent sticky by clicking on the Transparent button, type your text in.
Extra Features
Click on the Information button on the Palette to show the embed code.
Dates can be added to text stickies.
Pin a sticky to a canvas by moving the mouse over the top right hand of the sticky, a pin will appear, click on it to pin it. To unpin it, click on the pin again.
Move the stickies behind or in front by holding down the (Option Key-Mac) (Alt key-Win) and clicking.
Add tags to stickies which enables highlighting of all stickies with that tag.
There is a peel off option, click on the tick icon at the bottom of the right hand side of sticky. Once it has been peeled it is gone forever.
Sizes and colour of text can be changed when editing.
Stickies can be resized by clicking and dragging on the bottom right hand corner.
New stickies can be highlighted by clicking on 'Highlight New'.
How to use Lino It
In the example below I have used Lino It as a Presentation instructional tool.
Other ways of using it
- collaborative question answer (you would do this in groups on computers
- as an alternative to PowerPoint presentations
- as an instructional tool
- introduction to new topic
Scribble Maps and Google
One of the schools I visit are doing a Pacific Migration Unit and I showed some of the teachers how they could use Scribble Maps as an activity.
Each child can create their own Scribble Map illustrating where they or their family came from.
Type in the address, press Enter.

Markers
Click on the marker button
Select a marker from the choices, look at the drop down menu for more markers.
Mark the spot on the map.

Annotate your Markers
Add pictures and/or movies to the markers by clicking on the Advanced Editing choice. Images can only be entered by using a 'URL' Check to make sure the image you add is smaller than 300kbs. If it shows up to large in the map, you can change the width and height within the code 'width="500" height="370"' change the numbers to about width = 125 height =95

Draw a line using the line tool on the tool bar from one spot to the other.
Add text boxes by clicking on the ABC button. Click on the arrow button to move textboxes into place
The one problem I did come up with is in the embedding in blogs. I had to add a small bit of code to the html, so instead of this at the end
The Scribble map embeds fine in Wikispaces.
This example shows some of the Volcanoes in Auckland.
Keep up to date with new features from Scribble Map by reading their blog.
There are so many features that I haven't discovered yet, but I am sure your students will. This is an amazing resource which is always under development and being improved.
Each child can create their own Scribble Map illustrating where they or their family came from.
Type in the address, press Enter.
Markers
Click on the marker buttonSelect a marker from the choices, look at the drop down menu for more markers.
Mark the spot on the map.

Annotate your Markers
Add pictures and/or movies to the markers by clicking on the Advanced Editing choice. Images can only be entered by using a 'URL' Check to make sure the image you add is smaller than 300kbs. If it shows up to large in the map, you can change the width and height within the code 'width="500" height="370"' change the numbers to about width = 125 height =95
Draw a line using the line tool on the tool bar from one spot to the other.
Add text boxes by clicking on the ABC button. Click on the arrow button to move textboxes into place
Embedding
Click on the Menu button to Save and to embed into a blog or a wiki. Choose Widget/Embed.The one problem I did come up with is in the embedding in blogs. I had to add a small bit of code to the html, so instead of this at the end
The Scribble map embeds fine in Wikispaces.
This example shows some of the Volcanoes in Auckland.
Other Ways to use Scribble Maps
- plot places from a novel, journal story
- famous landmarks in your own country, the country you are studying or world
- plot a famous journey (Livingston, Shackleton, Hillary, Captain Cook)
- retell the adventures of an explorer, famous person
- retell your own family's migration story
- make up your own incredible journey plot the places visited and write/illustrate what you found there
- save the maps as pictures for inserting into Documents where students enlarge on what they have been writing about
- use with an Interactive Whiteboard (or projector on a screen) to create collaborative mapping
- improve students Geography by concentrating on a country at a time and find something indigenous to that country and adding it each day as a 'When we have a few minutes spare' activity
Keep up to date with new features from Scribble Map by reading their blog.
There are so many features that I haven't discovered yet, but I am sure your students will. This is an amazing resource which is always under development and being improved.
Thursday, April 29, 2010
Twitter? I just don't get it! A guide for teachers
I have heard the comment 'Twitter? I just don't get it!' so many times, so I have created a guide for teachers. I hope it helps!
Thursday, April 22, 2010
Fotobabble
I was reading a post about the iPad written by @dakinane when I saw him mention a flash based application using photos 'Fotobabble.
With this application you can upload a photo, add your voice to it and then embed into your wikis or blogs.
Fotobabble could be used in many ways in the classroom
With this application you can upload a photo, add your voice to it and then embed into your wikis or blogs.
Fotobabble could be used in many ways in the classroom
- as an oral assessment for speeches
- oral assessment for speaking in other languages
- a way of publishing a piece of writing, (selecting a photo that represents the writing)
- publishing explanations, narratives, persuasive and procedural
- final assessment tool in presenting information
- a linear slideshow presentation with several photos and voiceovers
The Amazing Web2.0 Projects Book
This book has been compiled by Terry Freedman (@terryfreedman) website http://www.ictineducation.org/
Teachers and educationalists from all over the world have contributed examples of Web2.0 projects to this book and what a great resource it is. Teachers will find many practical ideas of how to use Web 2.0 technologies in their teaching and learning.
Labels:
animoto,
aviary,
Flickr,
garageband,
Glogster,
Google,
iMovie,
jing,
skype,
Slideshare,
twitter,
Voicethread,
wallwisher,
Wordle,
youtube,
Zoho
Sunday, April 18, 2010
Word Clouds for Juniors
And yet another Word Cloud ABCya, (as tweeted by @mdanonbaird) which is perfect for Juniors.
Go to ABCyaPaste in text

Click on the Arrow
Click on Randomize to make changes to the Word Cloud
Click on Fonts to change the font,
Colours to change the layout colours
and Layout to change the direction of the text!
Click on Save to save to your computer or print out your Word Cloud.
Simple As!
Go to ABCya
Click on the Arrow Click on Randomize to make changes to the Word Cloud
Click on Fonts to change the font,
Colours to change the layout colours
and Layout to change the direction of the text!
Click on Save to save to your computer or print out your Word Cloud.
Simple As!
Monday, April 12, 2010
Tagxedo 'Word Cloud'
Thanks to Technololgy Bits, Bytes and Nibbles blog post and the writer @cyndidannerkuhn who posted it on twitter, I came across a new player in the 'Word Cloud' arena Tagxedo
There are a lot of choices with this Tag Cloud generator.
You have wide range of colours to choose from, interesting fonts (this example is called John Lennon).
Best of all, there is a variety of shapes or you can create your own word shape.
There are huge opportunities for this feature to be used in education.
The word shape could be
This link http://delicious.com/sharpjacqui/wordle are some of the sites I have found on Wordle or other Word clouds. This site (46 Interesting Ways to use Wordle in the classroom) by Tom Barrett is a collaborative Google Doc that anybody can add to with their ideas of how they are using Wordle.
Like Wordle you can save a jpeg or a png for printing out or inserting into blogs or wikis. But I'm looking forward to when you can embed an Interactive version called Tagxedo player like the example here on the Tagxedo site (Scroll down to the last example to see the Word Cloud dance).
Here is a great slideshow 101 ways to use Tagxedo by Hardy Leung
There are a lot of choices with this Tag Cloud generator.
You have wide range of colours to choose from, interesting fonts (this example is called John Lennon).
Best of all, there is a variety of shapes or you can create your own word shape.
There are huge opportunities for this feature to be used in education.
The word shape could be
- main theme or idea in book
- main theme of a poem
- the title of an essay/story
- main idea of story
- the focus of a science, history, social studies study
This link http://delicious.com/sharpjacqui/wordle are some of the sites I have found on Wordle or other Word clouds. This site (46 Interesting Ways to use Wordle in the classroom) by Tom Barrett is a collaborative Google Doc that anybody can add to with their ideas of how they are using Wordle.
Like Wordle you can save a jpeg or a png for printing out or inserting into blogs or wikis. But I'm looking forward to when you can embed an Interactive version called Tagxedo player like the example here on the Tagxedo site (Scroll down to the last example to see the Word Cloud dance).
Here is a great slideshow 101 ways to use Tagxedo by Hardy Leung
Friday, November 13, 2009
Apture - Snapshot tool for your wikis and blogs
Apture allows you to save webpages within your blog or wiki without leaving your site.
First you will need to download the plug in, click on Download Plugin.
Select a blog type and then click on the Install the extension (in this example Firefox)
You will need to open a new post page and the extension will be added.
Follow the instructions to activate the link.
Highlight the text that will open up the Snapshot
Click on the Apture link button
Paste in the URL address for the snapshot, click Go
Choose whether you want an External Link or a snippet then click on Create Link
Hold your mouse over the Link below (don't click) to see the snapshot window
Here is a snapshot of another one of my blogs
Or click on the Apture Embed button, paste in URL and click Go

Wiki Instructions
For a Wiki click on Other Platform and click on Get Started now then Create a Super Embed
Choose from the selections; article, map, audio, document, person, news article, webpage
Type URL address, click Go
An image will appear of the website.
Click on Create an Embed
Click on Copy this code
Paste into your Wiki Widget.
First you will need to download the plug in, click on Download Plugin.
Select a blog type and then click on the Install the extension (in this example Firefox)
You will need to open a new post page and the extension will be added.
Follow the instructions to activate the link.
Highlight the text that will open up the Snapshot
Click on the Apture link button
Paste in the URL address for the snapshot, click Go
Choose whether you want an External Link or a snippet then click on Create Link
Hold your mouse over the Link below (don't click) to see the snapshot window
Here is a snapshot of another one of my blogs
Or click on the Apture Embed button, paste in URL and click Go Wiki Instructions
For a Wiki click on Other Platform and click on Get Started now then Create a Super Embed
Choose from the selections; article, map, audio, document, person, news article, webpage
Type URL address, click Go
An image will appear of the website.Click on Create an Embed
Click on Copy this code
Paste into your Wiki Widget.
Monday, November 2, 2009
Textoriser -Textorise your images
Textoriser turns your pictures into words. In this example I have used the text from my ICT Teaching and Learning blog and my avatar.
First download the software from Textorizer, install the software. Upload a picture.
To use your own text, copy the text into a Word/Pages file and save the file as a .txt.
Click on the Change Text and browse to your text file.
There are two choices of Textorizing, the one I prefer using is Textorizer Two.
You will need to play around with the the font scale and text size (drag the blue bars up and down like sliders).
Click on Textorize when finished.
Maximize your screen before taking a Screen Capture
Here is an example of the same graphic with slightly bigger text.
Here is an example of a Picture created in KidPix, saved as a jpeg. The text was typed in Word and saved as a text file. Here are 3 different examples where I have adjusted the font scale, text size and Line height. Click on each example to see the full image.
First download the software from Textorizer, install the software. Upload a picture.
To use your own text, copy the text into a Word/Pages file and save the file as a .txt.
Click on the Change Text and browse to your text file.
There are two choices of Textorizing, the one I prefer using is Textorizer Two.
You will need to play around with the the font scale and text size (drag the blue bars up and down like sliders).
Click on Textorize when finished.
Maximize your screen before taking a Screen Capture
Here is an example of the same graphic with slightly bigger text.
Here is an example of a Picture created in KidPix, saved as a jpeg. The text was typed in Word and saved as a text file. Here are 3 different examples where I have adjusted the font scale, text size and Line height. Click on each example to see the full image.
Wallwisher in the classroom
If I was using this with students in real time I would not moderate it until later.
You do not have to set up an account, but for classroom use I would as you can save and view all of your walls.
First choose your wall colour and add distinguishing words to the end of your wall URL if you would like to personalise the wall. Click on the options of who is able to view or post notes. If you want to approve the posts click on the check box.
Type in a title for your Wallwisher by clicking on Click here to edit title and do the same for the Subtitle.
When you have finished click on the 'done' button in the bottom right hand of the screen.
To add a note, double click on the wall, type in your note which is limited to 160 characters.
You can add links to a website or to a movie by pasting in the URL at the bottom of the note.
The notes can be moved around and organised.
The notes can only be edited or deleted by the wall owner.
If you have given a unique name to your wall, anybody can view and add to it http://www.wallwisher.com/wall/ineducation but in this case I am moderating the comments.
Hero Machine Version 2.5
Hero Machine Version 2.5 is another Superhero site. This one is very comprehenisive and offers many choices. I particularly like how you can add a companion.
There is also four choices of bodies.
Once you have added all the parts and features to your superhero then you will need to take a screen capture
Update 3 November 2009
Jeff the Designer left a comment about my post and told me that HeroMachine Version 3.0 is in Alpha mode, it looks amazing, heaps more options. Kids are going to have fun with this one!
There is also four choices of bodies.
Once you have added all the parts and features to your superhero then you will need to take a screen capture
Update 3 November 2009
Jeff the Designer left a comment about my post and told me that HeroMachine Version 3.0 is in Alpha mode, it looks amazing, heaps more options. Kids are going to have fun with this one!
Subscribe to:
Posts (Atom)


